How-To Guide
Building a Chip
- Start by building the chip’s structure out of any block you want. You can’t use sand or gravel and the block type must be different than the input/output/interface blocks type (see below).
- Place a wall sign attached to one of the chip blocks. This is the starting point of the circuit and affects the order of input and output pins. Set the sign text according to the circuit you’re trying to build. See the circuitdocs for more info.
- Add output blocks (gold block by default) and input blocks (iron block by default). Each block has to be attached to a chip block. Changes in redstone current will be sensed on any side or on top of the input blocks.
- The circuit outputs its bits by setting levers on and off. Attach levers to any side or on top of each output block.
- Some circuits, such as the synth circuit require you to add interface blocks (lapis blocks by default). Again, make sure that each interface block is attached to a chip block. The circuit will then use blocks on any side, on top, or below as a point of interaction with the “physical” world or the player. In the case of the synth circuit, it will play a note on any noteblock attached to its interface blocks.
- Last but not least, go back to your circuit sign and left-click it to activate the circuit. If all went well, you should receive a message saying ‘Circuit X activated: > a input(s), b output(s), and c interface block(s)’.
The order of your input and output blocks is very important as different pin numbers have different functions. In simple circuit structures the pin numbering starts at the chip sign onwards. See “Chip detection scanning rules” below, for information on predicting the order of pins in more complex structures.
If you’re having problems or just want to see more information, you can use the debugging commands /rcdebug, /rcinfo and /rcpin. See the description below.
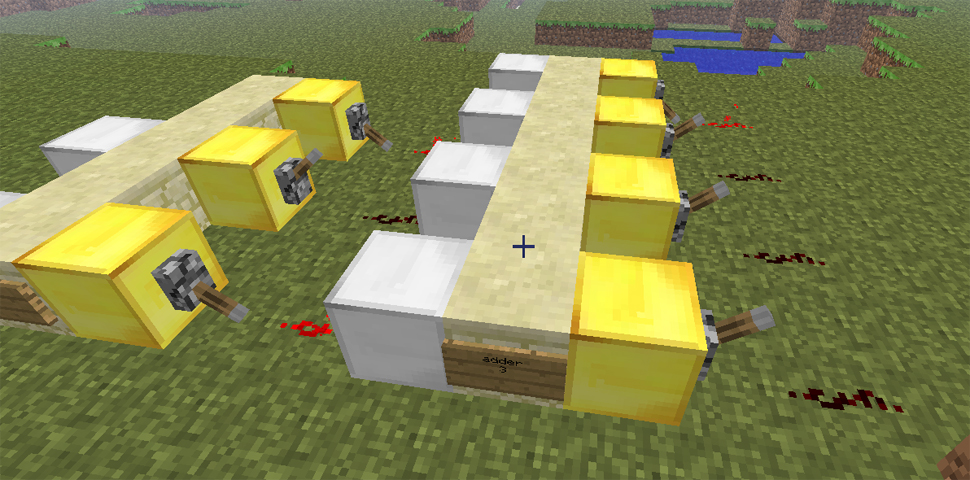
Simple adder circuit. Input and output 0 lies next to the circuit sign.
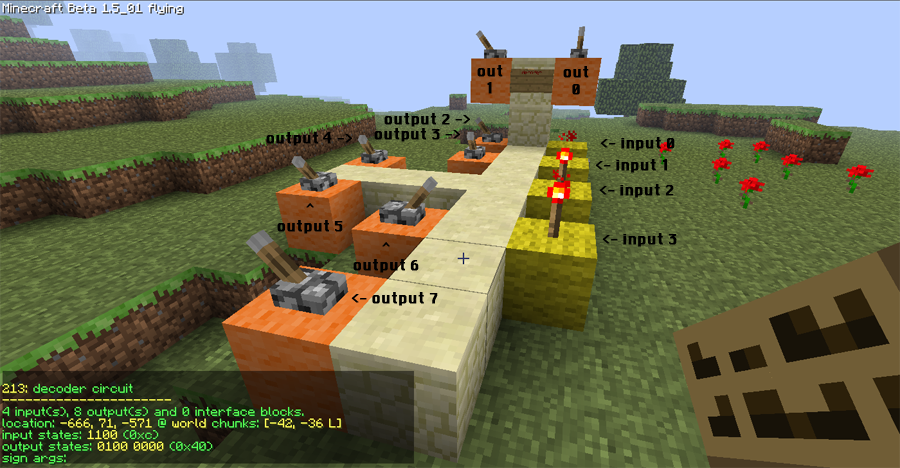
A decoder circuit with a more complex structure. Input and output order is a bit harder to find out.
Plugin commands
/rclist - Prints a list of active chips.
usage: /rclist [world-name|all|this] [<filter-type>: <arg>,<arg>,<arg>;…]
The command without any arguments will list all circuits in the current world or, when used from the server console, circuits in all worlds.
Use /rclist all as a player to see a list of all circuits on the server Use /rclist <world-name> to list all circuits in a specific world.
To show only specific kind of circuits you can use a filter. There are several filter types. location: <x>,<y>,<z>,[radius] - Show only circuits in a radius around the location. location: this, [radius] - Uses your current location. chunk: <x>,<z> - Show only circuits in the specified chunk. chunk: this will use your current chunk class: <class-name> - Show only circuits of the specified class. You can use partial class names. You can combine different filters by separating them with a semicolon (;). You can also use partial filter type names.
Examples: /rclist this ch: this; cl: pix - List every pixel circuit in your current world and chunk. /rclist this loc: this, 10; class: decoder - List every decoder in a 10 block radius around you.
/rcclasses - Prints a list of installed circuit classes.
usage: /rcclasses
/rcarg - Replace, add or clear circuit sign arguments.
usage: /rcarg <arg-number|add|clear> <arg-value>...<arg-number|add|clear> <arg-value>
Use by pointing at the circuit you want to edit and execute the command. To change an existing argument value use /rcarg <arg-number> <arg-value>, where arg-number is the sign argument number, starting to count with 1 and arg-value is the new value for this argument.
To add an argument as the last argument use /rcarg add <arg-value>. To remove an argument use /rcarg clear <arg-number>
You can make changes to more than 1 argument by typing additional command arguments, for ex. /rcarg 1 val clear 2 will set the 1st argument to val and remove the 2nd argument.
/rcdebug - Register yourself as a debugger of a chip.
usage: /rcdebug [chip-id|off|alloff]
Use by either pointing at the circuit you wish to debug or by using /rcdebug <chip id> if you have admin priviliges.
To stop receiving debug messages from the chip use the same command again or use /rcdebug off or /rcdebug <chip id> off. To stop receiving debug messages from all circuits use /rcdebug alloff.
/rcpin - Prints information about a chip pin.
usage: /rcpin
Point towards an output lever or input redstone source to use. Prints the pin number (starting with 0), pin type (input/output), and current state (on/off) of the pin.
/rcactivate - Activates a circuit.
usage: /rcactivate [<inputBlockType> >outputBlockType> <interfaceBlockType>]
Point the circuit sign and execute the command. To activate a circuit built with different input, output or interface block types then set in the preferences use /rcactivate <inputBlockType> <outputBlockType> <interfaceBlockType>
/rcdestroy - Destroys a circuit and removes its blocks.
usage: /rcdestroy
Point at a block of the circuit you wish to destroy and enter the command. This command is disabled by default. To enable it use /rcprefs enableDestroyCommand true.
/rcbreak - Deactivates a circuit without removing its blocks.
usage: /rcbreak [circuit-id]
Point at a block of the circuit or enter the chip’s id number as an argument if you have admin priviliges.
/rcreset - Rescans and reactivates a circuit.
usage: /rcreset [circuit-id|all]
Use by pointing towards the circuit or by using the chip’s id number as an argument if you have op priviliges. Reset a circuit to scan for new i/o blocks or sign arguments and apply any changes.
Running /rcreset all will reset all active circuits. Use with caution!
/rcfixioblocks - Replace i/o blocks using incorrect materials.
usage: /rcfixioblocks [circuit-id]
Use by pointing at the circuit you want to fix or, if you have op priviliges, use a circuit id as an argument. Any i/o blocks using a different block type than set in the plugin’s preferences are replaced to the correct material.
/rcsel - Mass editing circuits within a selection cuboid.
usage: /rcsel [command]
To define a selection type /rcsel and right-click on two opposite corners of your cuboid. When no selection is defined /rcsel will try to use WorldEdit’s current selection.
When either types of selection are defined you can execute any of the following commands.
/rcsel activate [<input type> <output type> <interface block type>], /rcsel fixioblocks, /rcsel break, /rcsel destroy, /rcsel reset - These work the same as their single circuit counterparts. /rcsel list - Lists all circuits in the selection /rcsel clear - Clears the current selection.
/rcchannels - Prints a list of all wireless broadcast channels.
usage: /rcchannels [channel-name]
Use a channel name as an argument to print info about that channel.
/rcinfo - Prints a lot of useful information about a chip.
usage: /rcinfo [circuit-id]
Use by pointing at a block of the chip you want to get info about or use the chip’s id number as an argument.
/rchelp - Prints a list or description of all RC commands.
usage: /rchelp [command name]
Use /rchelp to list all the plugin commands. Use /rchelp <command name> to get help about a specific command.
/rcp - Moves to a different page when run after using a command with paging.
usage: /rcp [page #|prev|next|last]
Running the command without arguments will cause it to move to the next page or go back to the first if the last page was reached.
/rcprefs - Allows to see and change the plugin’s preferences.
usage: /rcprefs [pref key] [new value]
Use the command with no arguments to list all preferences values. To change a preference value use /rcprefs <pref key> <new value>.
/rcsave - Saves all circuit data to file.
usage: /rcsave
Makes sure all circuits are intact and saves their current state to the plugin’s circuits file. Should not be used unless there’s a problem with the automatic data save.
/rcload - Reloads circuit data from file.
usage: /rcload
This command will reload circuit states from file, resetting any changes made since last save.
Destroying a Chip
You can destroy a chip by breaking any of its structure blocks, including the output levers or by running the /redchips-deactivate command while pointing at a circuit block. Use /redchips-destroy to destroy the chip and remove all of its blocks. Creepers, TNT explosions and fire (in case you’re using flammable blocks) will also cause the IC to stop functioning. Power tools, however, will not cause it to decativate and can result in “phantom” circuits still taking place in memory without an actual chip to make them of any use. When the plugin saves it’s circuits states it will deactivate any circuit that any of it’s blocks were broken.
Chip detection scanning rules (for the advanced RC user…)
To be able to guess the pin numbering of more complex structures you need to understand how the plugin detects and scans the structure once you activate it by clicking on the sign. It scans the circuit block by block starting at the sign block itself. The pins are numbered as the circuit structure is scanned, therefore when the structure is a straight line the count starts at the sign and onwards. When more than one dimension is used the plugin will scan according to the following rules:
-
The sign block is added to the structure and then the plugin moves to the chip block the sign is attached to.
-
It will try to find input, output or interface blocks at any of the other sides of the chip block and above or below. The important part is the order in which different sides are scanned. First, it will look to the right (relative to the current scan direction), next it will look to the left. After that it will look at the next block in the original direction and finally it will look back, opposite to the scan direction. Finally it checks the block above and below. If going backwards seem like a waste of time see the next point.
-
Now the plugin will go to the next chip block. The scan order is
- The block to the right, relative to the current scan direction.
- The block to the left, relative to the current scan direction.
- The block in the same direction as before.
- The block in the opposite direction.
- One block up. If the block above is a chip block the scan will continue in the same direction as before only one level above.
- One block below. Will also continue in the same direction.
One very important thing to note is that the recursive scanning process work by branches. It will continue going from block to block in one direction even when chip blocks are found in other directions. Only when it reaches a dead end it will go back to try the other branches.
The exact algorithm can be found at the CircuitManager class. Specifically CircuitManager.checkForCircuit()
Preference keys
To change any of the preferences while playing, you can use the /rcprefs command. All values are stored in <craftbukkit folder>/plugins/RedstoneChips/preferences.yml.
Block types - these can be any material name or id.
inputBlockType- Sets the input indicator block material (IRON_BLOCKby default).outputBlockType- Sets the output indicator block material (GOLD_BLOCKby default).interfaceBlockType- Sets the interface indicator block material (LAPIS_BLOCKby default).
To add specific data values use <material name/id>:<data value> such as wood:2 for example for birch wood. Using specific wool colors is also possible, wool:yellow for example.
Message colors - these can be any chat color name.
infoColor- Color of info messages (GREENby default)errorColor- Color of error messages (REDby default)debugColor- Color of debug messages (AQUAby default)
Other
enableDestroyCommand- Enable or disable /redchips-destroy command. Possible values aretrueorfalse(falseby default).signColor- Sets the text color used for the circuit name when the circuit is activated. A hex code between 0-f. 4 (red) by default.rightClickToActivate- When set to true circuits will be activated by right-clicking their sign. Otherwise circuits are activated by left-click.
